
회사 프로젝트에서 내부 curl을 쏴야하는 기능을 개발할 일이 생겼다.
특성상 spring batch랑은 어울리지 않아서 spring curl 라이브러리들을 찾던 중
spring webClient라는 것을 찾았다.
Spring 어플리케이션에서 HTTP 요청을 할때는 주로 RestTemplate를 사용했다고 한다.
하지만 Spring5.0 버전부터는 RestTemplate는 유지모드이고 향후 deprecated 된다고 해서 webclient를 선택했다.
대안인 feign라는 것도 있었는데
Feign 이란?
- Rest 기반 서비스 호출을 추상화한 Spring Cloud Netfilx 라이브러리
- 선언적 방식
- 인터페이스를 통해 클라이언트 측 프로그램 작성
- Spring이 런타임에 구현체를 제공
오 ? 넷플릭스에서 만들었으면 잘 되어 있겠지? 하고 하루 동안 삽질을 해봤다.
만드는 방식은 쉬웠는데 단점이 endPoint를 하나 만들때마다 해당 인터페이스들을 하나씩 만들어줘야 하는 것 같아서
하루 삽질을 해보고 바로 접었다.. ㅋㅋㅋ
spring webClient란?
- 웹으로 API를 호출하기 위해 사용되는 Http Client 모듈 중 하나
- Single Thread, Non-Blocking 방식
- core 당 1개의 Thread를 사용
- spring측에서 권고하는 사항임
본 예제는 gradle 사용 방식입니다.
springBoot version : 2.5.4
의존성 추가
Gradle Dependency
dependencies {
	...
    // WebClient
	compile 'org.springframework.boot:spring-boot-starter-webflux'
	compile 'org.projectreactor:reactor-spring:1.0.1.RELEASE'
}
Maven Dependency
<dependency>
    <groupId>org.springframework.boot</groupId>
    <artifactId>spring-boot-starter-webflux</artifactId>
</dependency>
가장 간단하게 사용하는 예시
방법 1
WebClient webClient = WebClient.create();
방법 2 ( baseUrl 지정 )
WebClient webClient = WebClient
    .create("http://localhost:9192");
이 방법을 사용하여 각 업스트림 서비스에 대한 공통 WebClient를 만들 수 있습니다.
@Bean
public WebClient webClient(){
    return WebClient
        .create("http://localhost:9192");
}
이러한 공통 인스턴스를 어디에서나 사용하여 기본 URL에서 특정 리소스 실행 가능.
WebClient.ResponseSpec responseSpec =
    webClient
        .get()
        .uri("/users/" + userId)
        .retrieve();
방법 3 ( builder 이용 방법 )
WebClient webClient2 = WebClient.builder()
        .baseUrl("http://localhost:3000")
        .defaultHeader(HttpHeaders.CONTENT_TYPE, MediaType.APPLICATION_JSON_VALUE)
        .build();
간단한 WebClient 예제 몇가지를 적어보도록 하겠습니다.
1. GET 요청
@Autowired
WebClient webClient;

public Flux<Employee> findAll()
{
    return webClient.get()
        .uri("/employees")
        .retrieve()
        .bodyToFlux(Employee.class);
}

public Mono<Employee> findById(Integer id)
{
    return webClient.get()
        .uri("/employees/" + id)
        .retrieve()
        /*.onStatus(httpStatus -> HttpStatus.NOT_FOUND.equals(httpStatus),
                clientResponse -> Mono.empty())*/
        .bodyToMono(Employee.class);
}
2. POST 요청
@Autowired
WebClient webClient;

public Mono<Employee> create(Employee empl)
{
    return webClient.post()
        .uri("/employees")
        .body(Mono.just(empl), Employee.class)
        .retrieve()
        .bodyToMono(Employee.class);
}
3. PATCH 요청
@Autowired
WebClient webClient;

public Mono<Employee> update(Employee e)
{
    return webClient.patch()
        .uri("/employees/" + e.getId())
        .body(Mono.just(e), Employee.class)
        .retrieve()
        .bodyToMono(Employee.class);
}
4. DELETE 요청
@Autowired
WebClient webClient;

public Mono<Void> delete(Integer id)
{
    return webClient.delete()
        .uri("/employees/" +id)
        .retrieve()
        .bodyToMono(Void.class);
}
5. 타임아웃 설정 방법
@Bean
public WebClient getWebClient()
{
    HttpClient httpClient = HttpClient.create()
            .tcpConfiguration(client ->
                    client.option(ChannelOption.CONNECT_TIMEOUT_MILLIS, 10000)
                    .doOnConnected(conn -> conn
                            .addHandlerLast(new ReadTimeoutHandler(10))
                            .addHandlerLast(new WriteTimeoutHandler(10))));

    ClientHttpConnector connector = new ReactorClientHttpConnector(httpClient);

    return WebClient.builder()
            .baseUrl("http://localhost:3000")
            .clientConnector(connector)
            .defaultHeader(HttpHeaders.CONTENT_TYPE, MediaType.APPLICATION_JSON_VALUE)
            .build();
}
제가 적용한 방법은 회사 프로젝트 스펙에 맞춰 endPoint Body에 여러 요청이 들어올 경우
webClient를 이용해서 요청들의 응답을 모아 내려주는 방식으로 개발을 진행해야 했습니다.
그래서 Controller를 만들어 응답 바디를 파싱을 하고 요청 url들을 webclient 서비스 쪽에서 처리해주는 방식으로 개발 했습니다.
- Controller 쪽

- Service 쪽

reponse body가 String으로 넘어와서 ObjectMapper로 돌려서 응답 Dto에 넣어준 모습입니다.
WebClient를 호출하여 적용한 곳은 ( 따로 클래스를 만듦 )
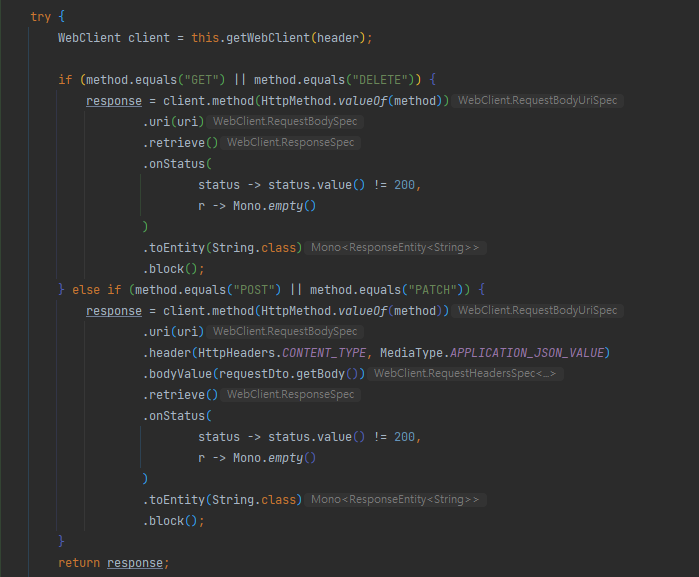
이런식으로 구현하였습니다. 상태코드가 200이 아닌경우에는 요청보낸 어플리케이션에서 내려주는 에러코드에 대한 바디를 담을 수 있게 처리 하였고
response = client.method(HttpMethod.valueOf(method))이 부분에서 같이 쓸 수 있도록 해주었습니다. client.get, client.post 이런식으로 쓰지 않고
client.method()를 사용했습니다.
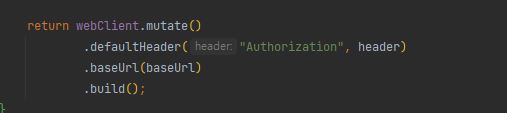
WebClient를 만들어 주는 곳에서는 기본 헤드와 baseUrl만 세팅하여 넘겨주었습니다.
webClient 공식 문서와 사용법을 써주신 다른 블로그들을 참고하여 만들어봤습니다.
부족한 부분이 많으니 잘못된 부분이 있으면 지적해주시면 감사하겠습니다.
참고 블로그 및 사이트
- https://howtodoinjava.com/spring-webflux/webclient-get-post-example/https://reflectoring.io/spring-webclient/
- https://reflectoring.io/spring-webclient/https://godekdls.github.io/Reactive%20Spring/webclient/
- https://www.amitph.com/introduction-to-spring-webclient/#What_is_Spring_WebClient
- https://godekdls.github.io/Reactive%20Spring/webclient
'프로그램이야기 > Spring' 카테고리의 다른 글
| Nginx React Springboot 연동 (6) | 2021.06.23 |
|---|

댓글